Showing posts with label Blogger. Show all posts

Chức năng mới của Blogger: Reaction (Phản ứng) và cách đưa vào Blog

ới Reactions (phản ứng)- tính năng mới của Blogger, bạn có thể nhận được một thông tin phản hồi từ việc nhấp chuột của bạn đọc. Bạn có thể hình dung nó như là một phiếu thăm dò ý kiến nhỏ cho mỗi bài đăng blog, hay là phiên bản mềm dẻo để xếp hạng sự yêu thích của độc giả đối với từng bài đăng và có thể tùy chỉnh những lựa chọn nào có sẵn theo ý bạn. Điều này sẽ giúp blog của bạn nhận được thông tin phản hồi từ những người đọc bài viết của bạn nhưng hơi ngắn gọn. Nói nhanh cho nó vuông là như thi trắc nghiệm vậy.
Để kích hoạt Reactions, bạn đăng nhập vào http://draft.blogger.com/ và đi đến Layout( Bố cục). Từ đây, click vào link “Edit” ở tiện ích Blog Posts (Bài đăng trên Blog) và sau đó kiểm tra "Reactions" (Phản ứng).
Bạn có thể chỉnh sửa Reactions bằng cách nhấp chuột vào nút Edit(Sửa) hoặc nhấp chuột như được hiển thị.
Bạn có thể tùy chỉnh vị trí của Reactions (Phản ứng) trong bài viết bằng cách kéo các qua xung quanh trong hộp Arrange Items("Sắp xếp Mục"). Chúng tôi thấy rằng nó có vẻ tốt nhất khi nó trên một dòng riêng, nhưng bạn có thể thay đổi tùy ý.
Bạn có thể tùy chỉnh các tùy chọn của họ và nhãn để phù hợp với chủ đề và phong cách của blog của bạn (nếu biết HTML).

Lưu ý: Nếu blog của bạn dùng Template cổ điển thì bạn chỉ cần thực hiện như trên là OK.
Nhưng đối với những blog có chỉnh sửa template thì có thể nó sẽ không hiện ra như ý. Để khắc phục điều này, bạn hãy vào phần chỉnh sửa Layout (Bố cục), chọn Edit HTML (Chỉnh sửa HTML), nhớ đánh dấu vào ô Expand widget templates (Mở rộng mẫu tiện ích), sau đó tìm tới đoạn mã sau (nhấn Ctrl+F để tìm từ "post-footer-line post-footer-line-2"):

<p class='post-footer-line post-footer-line-1'><!-- backlinks --><span class='post-backlinks post-comment-link'><b:if cond='data:blog.pageType != "item"'><b:if cond='data:post.showBacklinks'><a class='comment-link' expr:href='data:post.url + "#links"'><data:top.backlinkLabel/></a></b:if></b:if></span><span class='post-icons'><!-- email post links --><b:if cond='data:post.emailPostUrl'><span class='item-action'><a expr:href='data:post.emailPostUrl' expr:title='data:top.emailPostMsg'><span class='email-post-icon'> </span></a></span></b:if><!-- quickedit pencil --><b:include data='post' name='postQuickEdit'/></span></p>

Chèn vào ngay trước <div class='post-footer-line post-footer-line-2'>... hoặc sau thẻ < div > < /div > chứa "post-footer-line post-footer-line-2"

<p class='post-footer-line post-footer-line-2'><span class='reaction-buttons'><b:if cond='data:top.showReactions'><table border='0' cellpadding='0' cellspacing='0' width='100%'><tr><td class='reactions-label-cell' nowrap='nowrap' valign='top' width='1%'><span class='reactions-label'><data:top.reactionsLabel/></span> </td><td><iframe allowtransparency='true' class='reactions-iframe' expr:src='data:post.reactionsUrl' frameborder='0' name='reactions' scrolling='no'/></td></tr></table></b:if></span></p>

Thêm tiện ích Danh mục số trang - Page cho Blogspot

Mặc định của các mẫu blogspot, phía dưới cùng gần sát với footer là các danh mục về "trang" thông thường khi vào trang đầu tiên thì bao gồm 2 link là "Home" và "Old Post". Khi bạn click vàp "Old Post" thì sẽ được chuyển đến trang tiếp theo thì có thêm link "Newer Post".

Tuy nhiên, có một số Blog, phía dưới được thay bằng một danh mục đánh số trang nhìn rất chuyên nghiệp. Loay hoay tìm kiếm được trên mạng được tiện ích về "Số trang", để thực hiện chỉ cần đơn giản copy mã và dán vào tiện ích HTML/Javacript mà không phải cân thiệp Hack hoặc vào chỉnh sửa trong HTML. image

Tôi xin giới thiệu các bước thực hiện áp dụng cho Blogspot - Blogger để có được danh mục số trang như hình bên.

1. Đăng nhập vài tài khoản Blog của bạn tại http://www.blogger.com

2. Trong "Bảng điều khiển - Dashboard" của Blogger, bạn click vào "Bố cục - Layout"

image

3. Bạn hãy chọn click "Thêm tiện ích - Page Elements". Khi xuất hiện bảng lựa chọn "Thêm tiện ích", bạn cuộn chuột xuống dưới để lựa chọn "HTML/ Javascript" rồi click chọn vào dấu "+" bên phải.

HTML/ Javascript Gadget

4. Màn hình xuất hiện bảng "Định cầu hình HTML/Javascript - Configure" .

Trong phần nội dung bạn copy mã code dưới rồi paste vào.

<style>
.showpageArea {padding: 0 2px;margin-top:10px;margin-bottom:10px;
}
.showpageArea a {border: 1px solid #505050;
color: #000000;font-weight:normal;
padding: 3px 6px !important;
padding: 1px 4px ;margin:0px 4px;
text-decoration: none;
}
.showpageArea a:hover {
font-size:11px;
border: 1px solid #333;
color: #000000;
background-color: #FFFFFF;
}
.showpageNum a {border: 1px solid #505050;
color: #000000;font-weight:normal;
padding: 3px 6px !important;
padding: 1px 4px ;margin:0px 4px;
text-decoration: none;
}
.showpageNum a:hover {
font-size:11px;
border: 1px solid #333;
color: #000000;
background-color: #FFFFFF;
}
.showpagePoint {font-size:11px;
padding: 2px 4px 2px 4px;
margin: 2px;
font-weight: bold;
border: 1px solid #333;
color: #fff;
background-color: #000000;
}
.showpage a:hover {font-size:11px;
border: 1px solid #333;
color: #000000;
background-color: #FFFFFF;
}
.showpageNum a:link,.showpage a:link {
font-size:11px;
padding: 2px 4px 2px 4px;
margin: 2px;
text-decoration: none;
border: 1px solid #0066cc;
color: #0066cc;
background-color: #FFFFFF;}
.showpageNum a:hover {font-size:11px;
border: 1px solid #333;
color: #000000;
background-color: #FFFFFF;
}
</style>
<script type="text/javascript">
function showpageCount(json) {
var thisUrl = location.href;
var htmlMap = new Array();
var isFirstPage = thisUrl.substring(thisUrl.length-14,thisUrl.length)==".blogspot.com/";
var isLablePage = thisUrl.indexOf("/search/label/")!=-1;
var isPage = thisUrl.indexOf("/search?updated")!=-1;
var thisLable = isLablePage ? thisUrl.substr(thisUrl.indexOf("/search/label/")+14,thisUrl.length) : "";
thisLable = thisLable.indexOf("?")!=-1 ? thisLable.substr(0,thisLable.indexOf("?")) : thisLable;
var thisNum = 1;
var postNum=1;
var itemCount = 0;
var fFlag = 0;
var eFlag = 0;
var html= '';
var upPageHtml ='';
var downPageHtml ='';
var pageCount=5;
var displayPageNum=3;
var firstPageWord = 'First';
var endPageWord = 'Last';
var upPageWord ='Previous';
var downPageWord ='Next';
var labelHtml = '<span class="showpageNum"><a href="/search/label/'+thisLable+'?&max-results='+pageCount+'">';
for(var i=0, post; post = json.feed.entry[i]; i++) {
var timestamp = post.published.$t.substr(0,10);
var title = post.title.$t;
if(isLablePage){
if(title!=''){
if(post.category){
for(var c=0, post_category; post_category = post.category[c]; c++) {
if(encodeURIComponent(post_category.term)==thisLable){
if(itemCount==0 || (itemCount % pageCount ==(pageCount-1))){
if(thisUrl.indexOf(timestamp)!=-1 ){
thisNum = postNum;
}
postNum++;
htmlMap[htmlMap.length] = '/search/label/'+thisLable+'?updated-max='+timestamp+'T00%3A00%3A00%2B08%3A00&max-results='+pageCount;
}
}
}
}//end if(post.category){
itemCount++;
}
}else{
if(title!=''){
if(itemCount==0 || (itemCount % pageCount ==(pageCount-1))){
if(thisUrl.indexOf(timestamp)!=-1 ){
thisNum = postNum;
}
if(title!='') postNum++;
htmlMap[htmlMap.length] = '/search?updated-max='+timestamp+'T00%3A00%3A00%2B08%3A00&max-results='+pageCount;
}
}
itemCount++;
}
}
for(var p =0;p< htmlMap.length;p++){
if(p>=(thisNum-displayPageNum-1) && p<(thisNum+displayPageNum)){
if(fFlag ==0 && p == thisNum-2){
if(thisNum==2){
if(isLablePage){
upPageHtml = labelHtml + upPageWord +'</a></span>';
}else{
upPageHtml = '<span class="showpage"><a href="/">'+ upPageWord +'</a></span>';
}
}else{
upPageHtml = '<span class="showpage"><a href="'+htmlMap[p]+'">'+ upPageWord +'</a></span>';
}
fFlag++;
}
if(p==(thisNum-1)){
html += '&nbsp;<span class="showpagePoint"><u>'+thisNum+'</u></span>';
}else{
if(p==0){
if(isLablePage){
html = labelHtml+'1</a></span>';
}else{
html += '<span class="showpageNum"><a href="/">1</a></span>';
}
}else{
html += '<span class="showpageNum"><a href="'+htmlMap[p]+'">'+ (p+1) +' </a></span>';
}
}
if(eFlag ==0 && p == thisNum){
downPageHtml = '<span class="showpage"> <a href="'+htmlMap[p]+'">'+ downPageWord +'</a></span>';
eFlag++;
}
}//end if(p>=(thisNum-displayPageNum-1) && p<(thisNum+displayPageNum)){
}//end for(var p =0;p< htmlMap.length;p++){
if(thisNum>1){
if(!isLablePage){
html = '<span class="showpage"><a href="/">'+ firstPageWord +' </a></span>'+upPageHtml+' '+html +' ';
}else{
html = ''+labelHtml + firstPageWord +' </a></span>'+upPageHtml+' '+html +' ';
}
}
html = '<div class="showpageArea"><span style="padding: 2px 4px 2px 4px;margin: 2px 2px 2px 2px;border: 1px solid #333; background-" class="showpage">Page '+thisNum+' of '+(postNum-1)+': </span>'+html;
if(thisNum<(postNum-1)){
html += downPageHtml;
html += '<span class="showpage"><a href="'+htmlMap[htmlMap.length-1]+'"> '+endPageWord+'</a></span>';
}
if(postNum==1) postNum++;
html += '</div>';
if(isPage || isFirstPage || isLablePage){
var pageArea = document.getElementsByName("pageArea");
var blogPager = document.getElementById("blog-pager");
if(postNum <= 2){
html ='';
}
for(var p =0;p< pageArea.length;p++){
pageArea[p].innerHTML = html;
}
if(pageArea&&pageArea.length>0){
html ='';
}
if(blogPager){
blogPager.innerHTML = html;
}
}
}
</script>
<script src="/feeds/posts/summary?alt=json-in-script&callback=showpageCount&max-results=99999" type="text/javascript"></script>

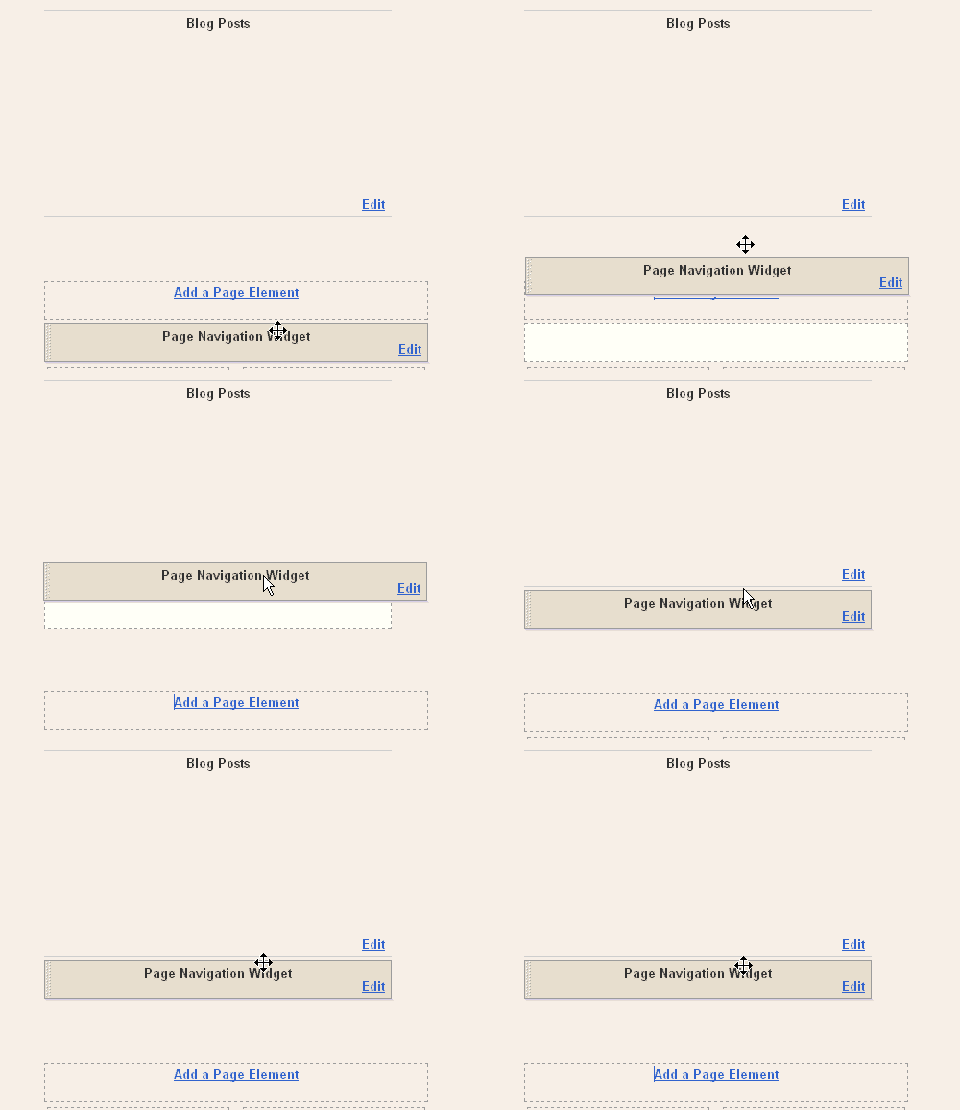
Sau khi đã thêm mã Javascript bạn cần kéo và thả tiện ích này vào dưới Blog Posts. Xem hình minh hoạ cho việc này.

Page Navigation Menu Widget

Trong đoạn mã trên bạn có thể thay đổi giá trị được đánh dấu màu đỏ như ở dưới.

1 : var pageCount = 5;
Con số này thể hiện số bài sẽ được hiển thị trên mỗi một trang. Bạn có thể thay đổi tuỳ ý, thông thường chọn số nhỏ hơn 10 để Blog được hiển thị với tốc độ nhanh hơn.

2 : var displayPageNum = 3;
Sổ biểu thị sô trang hiển thị trên thanh tiện ích.

Như vậy bạn đã có một Tiện ích mới để lựa chọn thêm vào Blogger/Blogspot của mình. Hãy commnet nhận xét về tiện ích này nếu bạn thấy thích thú với nó nhé. Chúc các bạn thành công.

Nguồn: Blog của Rias-techno-wizard

RevolutionTwo Church Blogger Template V2 Giống Hoàn Toàn Bản Dành Cho WordPress

Sau khi ra mắt bản V1 có nhiều blogger đã yêu cầu muốn thêm tính năng mà cụ thể là làm thế nào chó phiển bản sau trông y hệt RevolutionTwo Church của  WordPress. Bloganol đã đáp ứng được và hôm nay chúng ta đã có phiên bản mới:

Đây là phiên bản V1, các bạn có thể download hoặc xem DEMO:

3326662955_210594b194_o

DEMO | Download

Đây là hình ảnh và link để xem DEMO và Download template Revolution Church Version 2 updated:

3327499828_d2223308b5_o

DEMO | Download

Các bạn sẽ thấy phiên bản V2 có vẻ giống Revolution Church dành cho WordPress hơn và trông khá giống với Magazine Theme. Tuy nhiên, hiẹn tại thì guide hướng dẫn cài đặt và hiệu chỉnh chưa được tác giá đưa ra. Hy vọng trong thời gian tới sẽ có full guide cho các bạn.

Những bạn đã rành blogger thì có thể test thử và viết guide để anh em cùng thưởng thức nhé. Theo dõi xem guide tại trang của tác giả Bloganol

Vĩnh biệt Yahoo! 360 vào tháng 4/2009

Một quan chức Yahoo! Việt Nam tiết lộ Yahoo dự kiến sẽ đóng cửa hoàn toàn blog Yahoo! 360 vào tháng 4/2009, chuyển sang Yahoo! 360 Plus.

Yahoo sẽ đóng cửa Yahoo 360 vào tháng 4 năm tới, ông Vũ Minh Trí cho biết.
Hôm nay, ngày 19/11, trao đổi bên lề buổi họp báo công bố chiến lược mở của Yahoo tại Đại học FPT, ông Vũ Minh Trí, Tổng giám đốc Yahoo tại Việt Nam cho biết: Yahoo! sẽ duy trì dịch vụ blog Yahoo! 360 đến tháng 4/2009. Sau thời điểm đó, Yahoo sẽ đóng cửa dịch vụ này, các blogger tại Việt Nam có tài khoản trên Yahoo! 360 có thể chuyển sang Yahoo! 360 Plus. Các tài khoản chuyển đổi vẫn giữ nguyên toàn bộ bài viết, bình luận, số lượt xem từ Yahoo! 360.
Yahoo! 360 Plus chính thức ra mắt người dùng Việt Nam vào cuối tháng 4/2008 với mục đích thay thế cho Yahoo 360. Đây là dịch vụ Yahoo! phát triển cho người dùng Việt Nam, được Việt hóa toàn bộ giao diện và được bổ sung thêm một số tính năng trội hơn Yahoo! 360 như danh sách bạn bè tăng gấp 3 lần, có thể xuất tin RSS cho blog.
Theo ông Trí, Yahoo! 360 Plus thời gian đầu ra mắt còn nhiều lỗi nhưng gần đây đã trở nên hoàn thiện hơn. Tuy nhiên, đến nay vẫn còn rất nhiều người dùng Yahoo! 360 vẫn chưa chuyển sang dịch vụ mới Yahoo! 360 Plus, có thể do thói quen dùng giao diện tiếng Anh hoặc thích sự đơn giản của Yahoo 360.
Ông Trí cho cho biết Yahoo! hiện đang phát triển nền tảng mới là Yahoo! Profile. Đây là nền tảng tích hợp các dịch vụ mạng xã hội. Khi nền tảng này hoàn tất, Yahoo sẽ chuyển tất cả các dịch vụ mạng xã hội, trong đó có cả Yahoo! 360 Plus lên nền tảng mới này. Hiện tại, Yahoo! đang thử nghiệm việc kết hợp Yahoo! 360 Plus lên nền tảng Yahoo! Profile Theo ICT News

Chuyển blog yahoo 360 sang 360plus

Yahoo đã có công cụ chuyển 360 độ qua 360plus
TT - Các blogger Yahoo! tại VN có thể “chuyển nhà” bằng cách truy cập vào công cụ chuyển dữ liệu được cung cấp trên trang chủ của Yahoo! VN hay 360plus http://vn.blog.yahoo.com/chuyennha/. (ảnh). Theo đó, người dùng có thể sao chép tất cả bài viết từ 3600 sang blog yahoo 360plus (gồm cả những nội dung hình ảnh, video đã được chèn vào các bài viết). Các bài viết sẽ được ghi lùi theo thời gian đăng bài. Nội dung blog 3600 vẫn giữ nguyên như cũ sau khi sao chép sang 360plus.
Thời gian chuyển đổi mất vài ngày và sẽ có email thông báo hoàn thành đến người dùng. Trong lúc chờ đợi chuyển dữ liệu, người dùng có thể tiếp tục viết blog trên 360plus mà không bị ảnh hưởng. Những blog yahoo 3600 muốn chuyển dữ liệu phải được thiết lập chế độ public (mọi người đều có thể xem nội dung blog) và người dùng đã tạo tài khoản trong 360plus.
ĐỨC THIỆN, tuoitre.com.vn

Selective Expandable posts

Earlier, I had announced Peekaboo posts which shows post summaries in main page and expands them in the main page itself. But, some people would still like to use the classic way of expanding posts which takes the reader to the post page upon clicking "Read more" link. One of them asked me how to display the "read more" link only for some long posts and not others. I gave him a combination of peekaboo and non-peekaboo code that serves this purpose. As I started getting more such requests, I thought I will post the code for everyone who wants to use. Here's what you need to do.
1. Find the

</head>

tag in your template and add all the code from this page before it.


2. Find this div for the post-body and add the portion of code in red color.


<div class='post-body' expr:id='"post-" + data:post.id' >

<b:if cond='data:blog.pageType == "item"'>
<style>#fullpost{display:inline;}</style>
<p><data:post.body/></p>
<b:else/>
<style>#fullpost{display:none;}</style>

<p><data:post.body/></p>

<span id='showlink'>
<a expr:href='data:post.url'>Read More......</a>
</span>
<script type='text/javascript'>
checkFull("post-" + "<data:post.id/>");
</script>
</b:if>

<div style='clear: both;'/> <!-- clear for photos floats -->
</div>


3. Goto Settings->Formatting and at the bottom, you will find the text box provided to specify the "Post template". Copy/paste these lines into that text box and save the settings. (Please DON'T type these lines yourself because you might introduce some spaces that will break the functionality)


Type your summary here


<span id="fullpost">


Type rest of the post here


</span>


If you create a new post now, it shows you clearly where to type the summary and where to add the rest of the post. Please note that you could also divide some or all of your old posts into summary and full post by editing them. The "Read more" link will appear only for the posts that have been divided like this.


Note 1: If you are not able to find the lines to change, you may not have expanded the template. Select the checkbox named "Expand Widget Templates", which is right above the template code, to expand it into more code.


Note 2: If you click "Older posts" link, the "Read more" link may appear even for the posts which you haven't divided into summary and full post. This is a known problem which we haven't solved yet.


I hope you will link to Hackosphere in your sidebar. That's the only thing I expect in return ;)

Posted by Ramani


Backup Blogspot

Trường hợp nguy hiểm nhất là Google xóa blog của bạn! Một khi blog đã bị xóa thì không thể lấy lại được, do đó backup là rất cần thiết!
Nếu gõ vào thanh địa chỉ
http://blogname.blogspot.com/search?max-results=N
sẽ mở ra một trang liệt kê N bài viết của blogname.blogspot.com. Như vậy nếu bạn save trang này lại tức là đã backup xong blog! Thật đơn giản phải không bạn?
Bạn nên chọn số N sao cho lớn hơn hoặc bằng số bài viết của blog (ví dụ N =1000). Số bài viết của blog có thể xem trong trang Dashboard hoặc trang Quản lý bài viết.
Muốn download tất cả các hình ảnh trên trang vừa mở, bạn dùng một addson của FireFox. Khi chạy add-on này FireFox sẽ down về hết các hình ảnh trên trang được mở.
Bạn cũng có thể backup bài viết dưới dạng xml (feed) theo địa chỉ
http://blogname.blogspot.com/feeds/posts/default?max-results=N
và dùng file xml này bạn có thể import vào một số database có hỗ trợ!
Backup các comments theo địa chỉ:
http://blogname.blogspot.com/feeds/comments/default?max-results=N

Top 50 liên kết Blogger Templates

2-column templates

Andreas02 - Lots of tab links above the header. You can showcase the description of each active tab on the header.

Andreas08 - From the same author of the one above. The header is ready to be customised with your own picture.

Agua
- A minimalistic clean template giving a pure white look.

Cajas
- A blog tittle in a header that looks like the Blogger navbar and five menu links with multi-color backgrounds that tool the place of the traditional blog header.

Colibri
- This reminds you of a garden, doesn’t it?

Dead
- This one can be described as heavy metal/rock style - sinister and dark.

Eclipse
- Another dark theme that brings werewolves to mind. An enchanting template for the dark souls.

Emire
- Beautiful color combination but I wish there was more width for the post and the sidebar.

Hada-negra
- A beautiful template - seductive and pleasing to the eyes.

Integral
- The most striking visual details on this template are its rounded header and the green and sky-blue color combination.

iPhone
- An elaborate Wordpress theme converted into Blogger. The large header button could probably be used better.

K2
- A popular Wordpress theme cloned for Blogger.

Minyx
- A template that looks like an invitation card. Good use of space in the header.

Mushblue
- Striking header color and works well with the dark background.

Natural
- If you are the artistic kind, this one will be a feast for your eyes.

Neoneon
- This is another unique design - rectangle sidebar boxes and spiral main body.

Red-White Web 2.0
- The buttons are nice. The search bar looks like a candy bar. The color combination is good. A template true to its name.

S08
- A blue color body on a darker blue background - you might have thought it won’t work? But here it is.

Vertical
- As a the name suggests, this is a vertically designed clean template. You might want to throw in some more code and utilize the space below the blog title better.

Web 2.0
- A black and white template with a slight touch of blue color on the blog logo and the RSS feed.


3-column templates

Andreas4 - Another popular Wordpress template by Andreas cloned for Blogger. The template can be used as a bare bone structure for customization.

Autumn Grass
- I like the color combination and the vertical menu links in the header. There is also sufficient space there for ads and videos.

Beautiful Red Apple
- Another nice Wordpress theme converted into a Blogger template, has a 940px width frame, lots of space and customization possibilities.

Butterfly Magic
- Another beautiful color combination, or shall we call it just another butterfly effect

Clean Elegant
- Here’s one for all you Photoshop lovers, though we could do without the Adsense ad box, which spoils the whole meaning of the template.

Columnas
- This theme’s peculiar design stands out from the rest of the templates in this list. Nice and clean.

Cultivado
- Neat, floral, elegant - this one’s perfect for writing on life, philosophy, thoughts, poetry, love and the like.

Dark Ritual
- A nice theme which somehow reminds us of Adams Family.

Erudite
- A neat three-column Blogger template with the black color header and the orange color RSS icon gelling well.

Fluid Solution
- Another cool black and white look.

Fresh Blogger Template
- A fresh looking (it really is) green and blue theme. Great usability.

Garland
- Drupal’s default look copied to Blogger. Soothing to the eyes, isn’t it?

Glow
- If Hellboy or Flash Gordon wanted to blog, this is one template they might like.

Green Marinee
- A long time favorite of many bloggers ported to Blogger. Great use of space, and a nice color combination.

Hemingway
- A beautiful dark template - one column for the post body and three column on the footer.

Illacrimo
- A beautiful clone for Blogger from the Wordpress theme Illacrimo, though I feel there should be a way to use more space currently taken by the date-display on the left of the screen.

Informativo
- A similar template to the Columnas template above but with the header, for the less-unconventional bloggers who wants to stick with the proven.

Likewise v1.1
- A clean white template with one column for the post and with three column footer on a black background.

Magazine-Style
- A nice template if you have a lot of information and widgets to display up front. It has got a three columns in the main area as well as in the footer area.

Minimalista
- Another great port from Wordpress to Blogger.

Minyx 2.0
- A great template without pictures; good use of available space.

Pink Flower
- A simple and elegant template with an image of, you guessed it, a pink flower.

Pizza
- Don’t be dissuaded by the pizza theme if you are thinking of using this for a different subject blog. The template is highly customizable. The unique element in this template is the header which has been divided into two parts. You can display your blog logo or tittle on the left-side header box while using the other box for whatever you like.

Pro
- A different-look search box, menu links above the blog title, and the graduated blue header background in a unique design makes this template unique.

Puerto
- Somehow this template makes the post body look grand and majestic.

The Hobbit
- If you are a fan of Tolkien, this one is for you.

Neo
- A 3 column template that reloads in parts allowing faster reading and surfing.


4-column templates

Slined Mod 2.0 - Somehow, this one seems to fit a music/gaming theme best.

Neosapian - The contrast between black and red is striking. The second right-hand sidebar can be widen further and the red header can be used subtly for ads or to display more information. You decide whether to change the current header image or not

Qwilm - A simple looking great design that can be customized to a great extent.

Bộ sưu tập 30 công cụ Desktop cho Blogger

CÔNG CỤ BIÊN TẬP VÀ QUẢN LÝ


Windows Live Writer - viết và công bố bài viết một cách dễ dàng cho blog của bạn - hiện nay, công cụ này đã hỗ trợ cho: Blogger, Wordpress, Windows Live Spaces và một số webblog khác...

W.Bloggar - chỉ hỗ trợ hệ điều hành Windows :: Có thể viết bài ở các blog: Wordpress, Blogger, MovableType, TypePad, Drupal, b2evolution, Nucleus CMS, Squarespace, Community Server, BlogEngine.NET New! - có thể chạy từ USB.

AIRPress - hỗ trợ trên Windows và Mac và chỉ biên tập được cho Blog WordPress - các webblog khác sẽ hỗ trợ khi realease phiên bản mới.

Thingamablog - hỗ trợ biên tập và đọc rss từ các blog khác.

QumanaBlogDesk - công cụ tối ưu hóa cho WordPress, MovableType, Drupal, Serendipity và ExpressionEngine.


CÔNG CỤ THỐNG KÊ TẦN SUẤT TRUY CẬP


Google Analytics (Download Beta1 và Beta2) - Phát triển dựa trên công nghệ API của google, tương tự như Google Analytics, công cụ này thống kê và hiển chi tiết thông tin về số lương truy cập, để sử dụng công cụ này, bạn phải có Account truy cập vào Google Analytics và cài đặt thêm Adobe Air.

Snoop - Ghi lại dấu vết của những người ghé thăm blog của bạn theo thời gian thực từ desktop. Dịch vụ này được cung cấp bởi reinvigorate.net.

SERPs Finder - Tìm trên blog của bạn những từ khóa mà các cổ máy tìm kiếm như Google, Live và Yahoo! Search ưa thích.


CHỤP ẢNH CÁC ỨNG DỤNG

SnagIt 7 - Giá hiện tại là 29 USD, nhưng nó miễn phí ở phiên bản 7.0.

Snippy - Clip2Net - WebShot - Camstudio - Windows Media Encoder


XỬ LÝ ẢNH

GIMP - Nếu bạn ngại Photoshop quá nặng và bản quyền - bạn có thể sử dụng phiên bản này.

Paint.NET - Phần mềm open source để chỉnh sửa hình ảnh.

IrfanView


FTP

Filezilla - không cần giới thiệu thì chắc bạn cũng biết

FireFTP - Nếu bạn dùng FireFox thì FireFTP là công cụ hữu hiệu.


NGHIÊN CỨU TỪ KHÓA


Good Keywords - Quá tuyệt để xem từ khóa nào tốt nhất cho blog của bạn.


CHÁT BOX

Pwytter - Twitbin - OutTwit - Bổ sung cho trình duyệt mail Ms Outlook.

Pownce Client


QUẢN LÝ THỜI GIAN VÀ CÁ NHÂN

Rainlendar - Quản lý lịch công tác của bạn trên desktop.

Essential PIM - Quản lý thông tin cá nhân.


HTML


First Page - Quá dễ để chỉnh HTML trong blog template.

Komozer


ỨNG DỤNG KHÁC

WordPress Comment Moderation Notifier - Có bao giờ bạn set chức năng phê duyệt cho những nhận xét của bạn chưa? Công cụ này sẽ thông báo cho bạn biết có người đã để lại nhận xét trên blog của bạn.

How my blog change to three column of page element and blog spots?

Previouly, my blog is with normal layout one blog posts and one column of `add page element` and yesterday i able to change my blog to become one blog posts and two column of `add page element`. It's means that i have more space to put the thins i want and more add can be put in on one page view.
*old blog with one blog posts and one column `page element`

*new blog with one blog posts and two column of `page element`

below i will share on how i change my blog yesterday,
1. need to log in www.blogger.com and go in "layout"

2. we need to change html code of the blog and go in "edit html"

3. before we change anything on blog html, we must download the original template as if you feel dislike new blog template or amend wrong html code then you still got a chance to recover back your original blog. The template will download in a xml document and when you want to recover back your original blog, just upload a template on your hard drive.

4. now we will start to edit our own blog html, we will need to change the size of layout as we need to add in one more `page element`. Try to find outer-wrapper (can use CTRL F to search for word). Original is 660px and i change to 980px so your blog will look widther.


5. change on header-EASY MAKE MONEY ONLINE, if you want your header to look similar with your blog width then you need to find header-wrapper to change from 660px to any size you wish.


6. main-wrapper mean blog posts, you can change to size that you wish but need to count in others two `page element` size to fit in 980px outer-wrapper.


7. sidebar-wrapper mean the `page element`. I will change sidebar-wrapper to right-column (can rename as you wish), width from 220px to 180px as need to fit in and float: $endSide to right.


8. on step 7, you already change to right-column or others, now you need to find sidebar-wrapper to change to right-column as well.

9. now we will add in one more column for page element, need to key in below html under right-column html.
#rightsidebar-left {
margin:0 0 0 10px;
width: 180px;
float: left;
word-wrap: break-word;
overflow: hidden;
}

10. same as right-column, you need to add another html code show as below in between main-wrapper and right-column.


11. finally, you can save your template and figure out your new blog template.
If you feel that original is better or you make a mistake when amending html code, you still can recover your original template with upload previous backup template.
*if you think you want your main blog in middle and on left and right side is `page element`, all you have to do is move your "div id='rightsidebar-left'" hole html above "div id='main-wrapper'".
At last, thanks for reading.
Please do not hesitate to put in message or comment.

Hướng dẫn cách tạo blog của Blogger

Đây là dịch vụ blog hay nhất hiện nay. Blogger cho phép người sử dụng nhiều khả năng tùy biến hơn các loại blog khác.
Trước khi bắt đầu bạn cần có 1 địa chỉ email của GMail. Nếu chưa có thì vào đây (www.gmail.com) tạo.
Vào blogger.com dùng (tên) Username và (mật khẩu) password của email để đăng nhập.
Bước 1: Đăng ký Blogger
Tên hiển thị: ví dụ tôi dùng VinaBlog. Tên này sẽ hiển thị cho người xem ở phần thông tin cá nhân hoặc phần người viết bài.
Chấp nhận các Điều khoản: đánh dấu chọn vào ô vuông
Click Tiếp Tục >>
Bảng điều khiển: bạn nhìn qua cột bên phải sẽ thấy mục để chọn ngôn ngữ. Đối với các bạn ở Việt Nam (IP Việt Nam) thì sẽ có mặc định là Tiếng Việt, bạn có thể thay đổi ngôn ngữ khác nếu cần. Blogger mới hổ trợ giao diện Tiếng Việt khoảng từ giữa tháng 6 năm 2007
bạn click vào Tạo Blog hoặc Tạo blog của bạn ngay bây giờ
Bước 2: Đặt tên cho blog
Tiêu đề của blog: ví dụ VinaBlog - Thủ Thuật Blog Chat Mail
Địa chỉ URL của blog: bạn cần chọn tên cho blog. Tên này phải không trùng với những blog đã có. Để kiểm tra bạn gõ tên blog của bạn rồi click vào Kiểm Tra Tính Sẵn Có nếu xuất hiện câu thông báo màu xanh "Địa chỉ blog này có sẵn" thì bạn có thể dùng tên đó. Ví dụ tôi chọn là VinaBlog thì khi đó địa chỉ blog của tôi là http://vinablog.blogspot.com
Click Tiếp Tục để qua trang tiếp theo >>
Chọn một mẫu
Ở bước này bạn cần chọn mẫu giao diện chính cho blog (mặc định là mẫu Minima). Click lên mẫu nào bạn thích rồi click Tiếp Tục >>
"Blog của bạn đã được tạo!
Chúng tôi vừa mới tạo một blog cho bạn. Bây giờ bạn có thể đăng các bài viết lên blog, tạo hồ sơ cá nhân, hoặc tùy chỉnh giao diện của blog.". Đến đây thì bạn đã tạo xong blog. Hãy click Bắt Đầu Đăng để viết (post) bài đầu tiên cho blog >>
Để viết (soạn thảo) một bài cũng rất dễ dàng
Tiêu đề: tiêu đề của bài viết
Nôi dung thì ở hình chữ nhật to bên dưới
Các nhãn cho bài đăng: các chủ đề của bài viết
Tùy chọn bài đăng: click vào sẽ thấy "Cho phép" và "Không cho phép" nhận xét của người đọc.
Khi đã soạn thảo xong bạn có thể click vào Xem Trước để thấy kết quả. Nếu thấy được thì click vào Xuất bản bài đăng để đưa bài lên blog cho mọi người xem.

Đưa lightbox vào blogspot

Chú ý: hiệu ứng chỉ chạy tốt trên nền Internet Explorer. Người dùng Firefox có thể không xem đc hiệu ứng này.

Trước hết Lightbox là thế nào?

Đơn giản, Lightbox là một dạng cải tiến từ popup. Nó giống Popup là nó cũng bật ra (pop up), "đè" lên phần còn lại của trang web. Nhưng khác Popup ở một điểm cơ bản, nó không mở ra cửa sổ nào mới mà là một khung chứa (container) ngay trong trang web hiện tại.

Xem mẫu sau: (click vào tấm hình nhỏ phía dưới, chỉ với IE mà thôi)

cat11024

Bạn đã thấy hiệu ứng rồi đấy. Trên cả tuyệt vời phải không?

Hướng dẫn Cài đặt

Phiên bản: 2.03.2
tác giả: Lokesh Dhakar

Đưa 4 dòng code sau vào phần head trong template của bạn.
Hãy nhớ backup trước khi làm:
Vào Dashboard → Layout → Edit HTML → Download Full Template.

<script src='http://quydhnni.googlepages.com/prototype.js type='text/javascript'/>
<script src='http://quydhnni.googlepages.com/scriptaculous.js?load=effects type='text/javascript'/>
<script src='http://quydhnni.googlepages.com/lightbox.js type='text/javascript'/>
<link href='http://quydhnni.googlepages.com/lightbox.css media='screen' rel='stylesheet' type='text/css'/>

Save Template lại

Sử dụng thế nào?

Cực kỳ đơn giản, sau khi bạn upload một tấm hình vào bài viết. Nó sẽ có đoạn code với dạng như sau:

<a href="Địa_chỉ_thật_của_ảnh"><img src="địa_chỉ_hình_thu_nhỏ_(thumbnail)"></a>

Bây giờ bạn hay thêm vào thẻ <a> 2 thuộc tính là title="Tên_hình" và rel="lightbox" (tên hình có thể bỏ qua). Và bạn có đc đoạn code mới như sau:

<a title="Tên_hình" href="Địa_chỉ_thật_của_ảnh" rel="lightbox"><img src="địa_chỉ_hình_thu_nhỏ_(thumbnail)"></a>

Vậy là xong. Từ nay, khi người xem click vào tấm hình nào có thuộc tính rel="lightbox" thì hiệu ứng Lightbox sẽ xuất hiện.

Muốn thoát khỏi lightbox, chỉ cần bấm ra vùng bên ngoài ảnh. Ngoài ra bạn cũng có thể bấm nút Close x hay phím tắt X từ bàn phím.

Nhiều hình cùng nhóm

Lightbox 2 có thể đưa nhiều hình vào một nhóm để dễ dàng chuyển từ hình này sang hình khác. Muốn vậy, bạn chỉ cần sửa thành rel="lightbox[tên_nhóm]" ở mỗi ảnh trong nhóm.

Việc di chuyển trong nhóm có thể thực hiện bằng 3 cách:

  1. Dùng phím mũi trên ← và →.
  2. Dùng phím N (next) và P (previous)
  3. Nhấn chuột vào nửa bên trái hay nửa bên phải của tấm hình
Chú ý:

Địa chỉ hình thu nhỏ cũng có thể chính là địa chỉ thật của ảnh.

Với Blogger, khi bạn upload hình lên từ máy (không phải chèn hình có sãn trên mạng) thì tự động nó đưa ra link hình thật và cả link hình thumbnail. Nhưng, link thật đó đc định nghĩa để không thể mở trực tiếp từ trang blogspot.com (vì lý do bảo mật). Vì vậy, muốn dùng lightbox trong trường hợp này, bạn phải sửa lại đôi chút trong link full-size:

https://blogger.googleusercontent.com/img/b/R29vZ2xl/AVvXsEgV-1NO2rWrABxQmpphPZVrBOkxlYxwyj6MJ-AtiBk_eBgdGPiIpOg5ptQLD5q1Ip1nYcFLfaO2eNBOu8s48__b13LKL8Ffpoq5uXWov71G8lvPuRozRAWJCOexKMmPMb5jETpq9uoHnbc/s1600-h/tumlumtala.PNG

bây giờ bạn hãy bỏ ký tự -h đi. Như vậy, bạn sẽ có:

https://blogger.googleusercontent.com/img/b/R29vZ2xl/AVvXsEgV-1NO2rWrABxQmpphPZVrBOkxlYxwyj6MJ-AtiBk_eBgdGPiIpOg5ptQLD5q1Ip1nYcFLfaO2eNBOu8s48__b13LKL8Ffpoq5uXWov71G8lvPuRozRAWJCOexKMmPMb5jETpq9uoHnbc/s1600/tumlumtala.PNG

Nếu quan tâm hơn tới người xem, trong trường hợp màn hình của họ không đủ rộng để xem toàn bộ chiều ngang tấm hình. Khi đó lightbox sẽ là trở ngại. Để khắc phục tình huống này. Bạn có thể thay link full-size lại thành:

https://blogger.googleusercontent.com/img/b/R29vZ2xl/AVvXsEgV-1NO2rWrABxQmpphPZVrBOkxlYxwyj6MJ-AtiBk_eBgdGPiIpOg5ptQLD5q1Ip1nYcFLfaO2eNBOu8s48__b13LKL8Ffpoq5uXWov71G8lvPuRozRAWJCOexKMmPMb5jETpq9uoHnbc/s800/tumlumtala.PNG

cũng có thể dùng s640, s320,... thay cho s800 đó chính là số pixel chiều ngang tối đa của hình (1600 là full size)

Chúc bạn thành công

/